
Help
Note :
This help is included into the program : you can view it by clicking on the "Help" button, then on "Detailed Help".
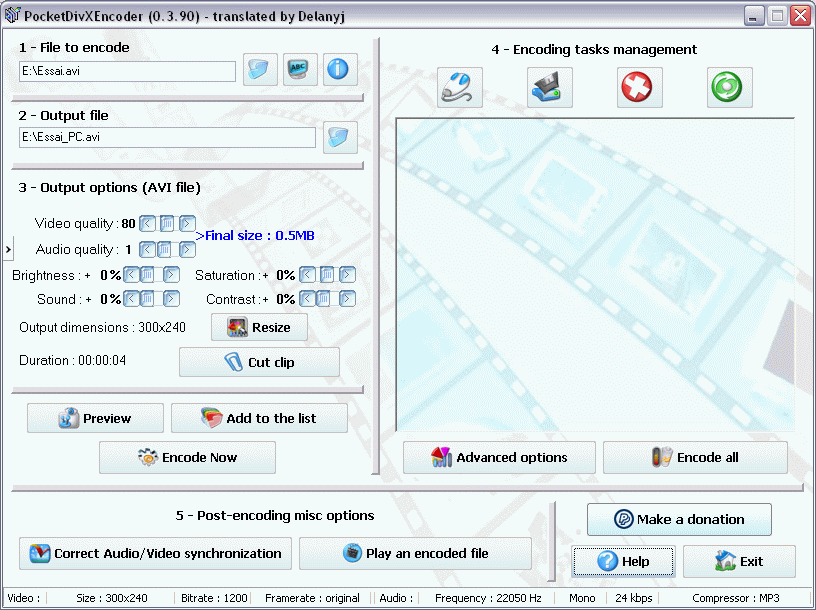
File to encode
Subtitles selection
Video information
Output file
Video quality
Audio Quality
Brightness / Sharpness / Contrast
Volume
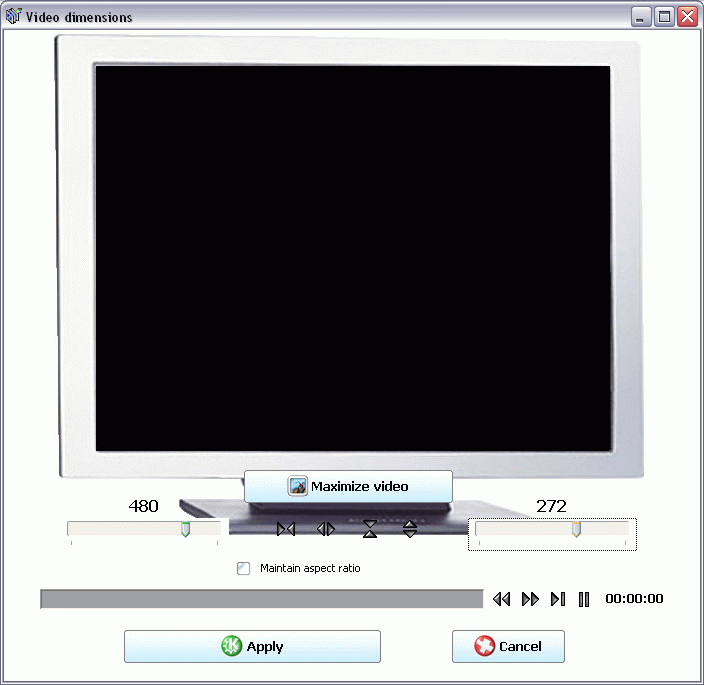
Video size
Cutting the video
Preview mode
Direct Encoding
Add to the task list
Open a list
Save a list
Delete a task
Delete all
Encode all
Correct Audio/Video sync
Play an encoded file
Handled device selection
Orientation
Max resolution
Direct Audio/Video Stream Copy
B-Frames
2-pass encoding
De-Interlace
VHQ
No Audio
Framerate
IVTC - Inverse Telecine
XviD
Normalize audio
Live effect
Save settings / Restore settings
Video stream information
Audio stream information
Readme
FaQ
Changelog
My email address
Special Thanks
Add a right-click menu
Uninstall
Default language
Font/Size/Charset for subtitles
What is the aim of this program
How can I make a DVD copy with this software
What are the software requirements for PocketDivxEncoder
When playing a file on my PC, there are some artifacts on the video
I don't know how to play movies on my Palm/PocketPC/Smartphone
The clip is stretched / flipped upside-down
Your program made my computer crash
OK, I understand but why does my computer crash when I use PocketDivXEncoder
When I encode a file without checking the "XviD" box, the output file still uses the XviD codec
I want to submit a bug / a suggestion / I want to receive the source code
You do so many English mistakes, I can't even understand what you are saying
When I hit the "Encode" button, a window appears then immediately disapears and nothing is encoded...
 Go back to the top of the page
 File to encode :
|
Subtitles selection :  . PocketDivXEncoder displays a dialog box in order for you to choose any subtitle you want to encode with your video file.
|
Video information :  displays some useful information on your input movie file and on your operating system. For more information on this option, just go to the "Video information" section. Go back to the top of the page
  Output file : . By default, PocketDivXEncoder will use the same path as the input file and the same name as the input name with the "_DeviceType.avi" suffix. Go back to the top of the page
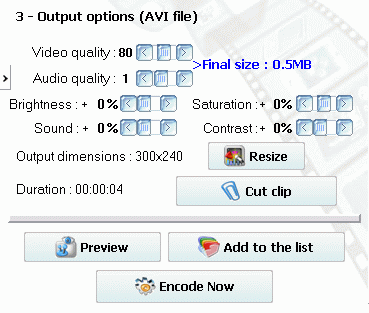
|
Video quality :
|
Audio Quality :
|
|
Brightness / Sharpness / Contrast : Volume : Video size :  which brings up a dialog allowing you to match the size of the generated video to the physical size of the device upon which it will ultimately be played. This way of resizing/cropping could be a little confusing at first see, but it seems to be the most intuitive way of changing your movie's parameter because it is the only way that allows you to see exactly how your movie will be rendered on your device. How this works :
Click on the "RESIZE" button on the main form
|
|
|
|
Cutting the video :  ) a simplified video player is displayed allowing you to select both the beginning and end of the video to include in the new video file. There is a slider allowing slewing through the video in much the same way as the media player allows. You press the Mark as Beginning and Mark as end buttons in order to describe the start and end of the desired video. Preview mode :
|
Direct Encoding :  Click this button if you want to launch the encoding process with the settings you just chose. Add to the task list :
  Click on this button if you want to add the encoding task you just set up to a batch list. This will allow you to encode your jobs later, for example during the night. Go back to the top of the page
  Open a list :
  . Save a list :
  . Delete a task :
  . Delete all :
  . Encode all :
  ). Go back to the top of the page
  Correct Audio/Video sync :
  . Play an encoded file :
  . Go back to the top of the page
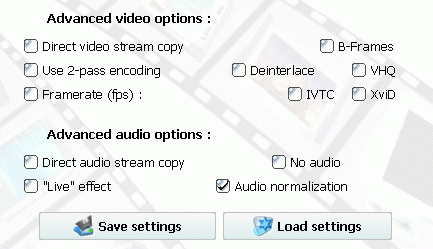

|
Handled device selection : Orientation : Max resolution :
), just choose a "Medium resolution".
Direct Audio/Video Stream Copy : B-Frames : 2-pass encoding : De-Interlace : 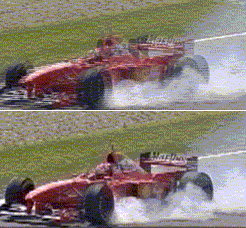 VHQ : No Audio : Framerate :
|
IVTC - Inverse Telecine : XviD : Normalize audio : Live effect : Save settings / Restore settings :
|
Go back to the top of the page 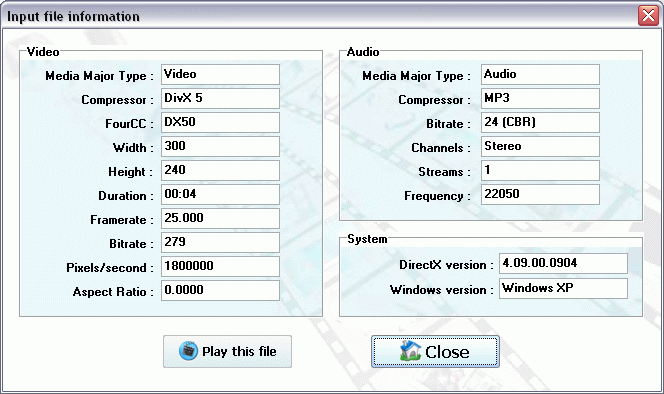 Video stream information :
Audio stream information :
Go back to the top of the page  Readme : . FaQ : Changelog : My email address :
  button that appears at the end of the encoding process instead (it will give me more information on your bug)... Thanks ! Special Thanks : Add a right-click menu :
  , a PocketDivXEncoder option will be added to the Windows context menu for video files. When you will right-click on a video file, you will be allowed to choose "Encode with PocketDivXEncoder". Uninstall :
  . Default language : Font/Size/Charset for subtitles : Go back to the top of the page
  What is the aim of this program ?
  PocketDivxEncoder allows you to encode video files with parameters that fit the capabilities of your specific handled device (PDA, Smartphone, Palm, Portable video players, DivX players). How can I make a DVD copy with this software ? This program doesn't help you to copy commercial DVDs because it is completely illegal ! I won't answer any questions about any illegal stuff, so don't ask. What are the software requirements for PocketDivxEncoder ? You have to install a recent version of DirectX (>9). If you don't know which version of DirectX is installed on your system, just run my program... If your version is out-of-date, it will display a warning. No other soft or codec is required to make PocketDivxEncoder work. When playing a file on my PC, there are some artifacts on the video : You need to play your movies with another software player : this problem can happen when rendering non-DivX (e.g. XviD or FFMPEG) movies with the DivX codec. Try using a player like MPlayer or VideoLanClient. I don't know how to play movies on my Palm/PocketPC/Smartphone ! You need to download TCPMP and to install it on your Palm/PocketPC/Smartphone... The clip is stretched / flipped upside-down ! ...that's why I've implemented some resize and pre-rotate functions! You can change the rotation option by clicking on the PDA in the "Advanced options". Your program made my computer crash ! This program is in its early stages of development, so it is possible it contains some bugs. I'm not responsible for any damage this program could cause to your computer. However, this program doesn't use any critical resource of the computer, so it is not likely to make it crash... OK, I understand but why does my computer crash when I use PocketDivXEncoder ? I'm sorry but I think it has something to do with your hardware : PocketDivXEncoder uses nearly 100% of your CPU, so the CPU is getting very warm during the process. The problem is often caused by a cheap CPU fan which is not sufficient... but it can be caused by a corrupted RAM component or something... When I encode a file without checking the "XviD" box, the output file still uses the XviD codec : The output file is not actually a XviD file but a FFMPEG file. However, in order the encoded files to work on the majority of PMP types, the FourCC (the field in the video file that describes the video codec) used when encoding with PDE is "XviD". That's why some software like Gspot wrongly assume that the video file is an XviD file whereas it's not. I want to submit a bug / a suggestion / I want to receive the source code : No problem, send-me a mail with a precise description of how the bug happened (if it is for a bug report)... Please, use the utilities provided to help me recreate the same bug on my computer : you can copy/paste the log that appears at the end of the encoding process for example ! Also tell me which software and version you use (for encoding AND playing movies...). Thanks a lot ! You do so many English mistakes, I can't even understand what you are saying ! Well... Sorry... I'm French and you know how bad we speak English... Sorry for that... Please, send-me a mail in order to correct my English mistakes ! When I hit the "Encode" button, a window appears then immediately disapears and nothing is encoded... Windows XP data execution prevention causes massive problems in PocketDivXEncoder. To turn it off :
 TIP !
TIP ! click on the button
  WARNING !